Implementing Business Rules Using Commands
As the next step, we want to:
- Validate that the email provided by the user looks like a valid email.
- Ensure that the body is at least 10 characters long and has no more than 200 characters.
To achive this, we will implement Business Rules for our Contact Us form using Commands.
Refer to the core module documentation to learn more about Commands.
Understanding Commands and Business Logic
In platformOS, we recommend structuring your code using Commands pattern to implement business logic in your applications. They allow you to encapsulate specific actions or operations into reusable components that can be easily invoked throughout your project. Think of commands as predefined functions that handle various tasks, such as processing data, performing validations, or interacting with your database.
Using commands promotes clean, reusable, and testable code. By organizing your logic into distinct commands, you can easily maintain and reuse them across different parts of your application. This structure simplifies collaboration among multiple developers, as there is a shared convention and it is easier to discover existing capabilities of the system, without re-implanting the same functionality multiple times.
Tip
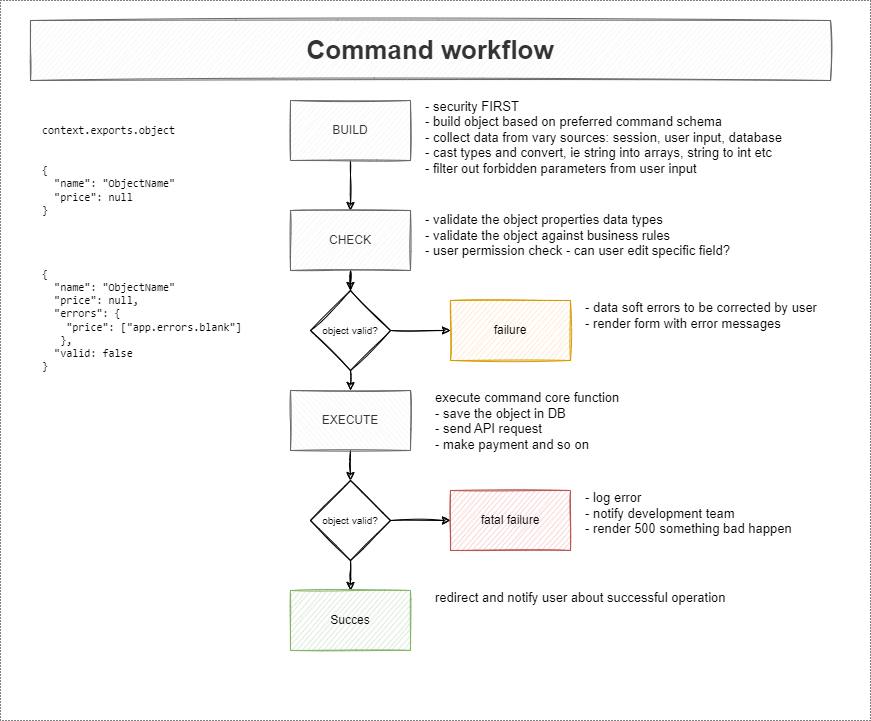
Commands follow a clear structure known as the build/check/execute pattern, which helps to keep your code organized and maintainable.
The Build/Check/Execute Pattern
The build/check/execute pattern in platformOS provides a clear and organized approach to managing business logic within commands. This structured methodology ensures that your code is not only effective but also easy to maintain.
By splitting these stages into separate files, you promote clean, modular, and testable code. This approach also makes it easier for multiple developers to work on the project simultaneously.
| Stage | Description |
|---|---|
| Build | This first step is all about preparing the input for the command. It normalizes and processes the data received from users, ensuring it’s formatted correctly for the next steps. Think of it as getting everything ready before you dive into the core functionality! |
| Check | At this stage, the command validates the input data. This involves checking that all necessary fields are present, filled out, and meet specific criteria—for example, ensuring the email is valid and that the message body is of the appropriate length. If something goes wrong, detailed error messages are provided to help the user understand what needs fixing. |
| Execute | The execute phase is where all the important actions take place, such as saving data to the database or initiating other processes. Think of it as the final piece of the puzzle that brings everything together. This step is essential because it invokes the GraphQL query, allowing the data to be stored effectively. This phase builds on all prior validations, ensuring everything functions smoothly. If any validation checks fail—like if a required email address is missing—it indicates a problem in the check phase, potentially preventing successful execution and leading to errors such as a 500 error, signaling a glitch in the code. To avoid such pitfalls, the execute command should always succeed when validations are implemented correctly, highlighting the importance of conducting thorough checks before moving on to execution. By doing so, you ensure your application runs as intended and provides a seamless experience for users. |
Best Practices for Using Commands
We recommend placing your commands in the lib/commands directory, following the naming conventions of <resource>/<action>, for example, contacts/create.liquid. This organization keeps your project structured and easy to navigate.
Commands are designed to be easily executed as background jobs for heavy operations, such as external API calls, expensive computations, or generating reports. Additionally, each command might produce an Event, allowing for further integration with your application's workflow.
Now, we will implement business rules for our Contact Us form using commands. Specifically, we will focus on validating user inputs to ensure they meet certain criteria before processing them. This ensures a smooth and reliable experience for users interacting with your application.
Create the folder structure
First, create the following directories and files:
mkdir -p app/lib/commands/contacts/create
-
In the
appdirectory, create alibdirectory. -
Within the
libdirectory, create a commands directory. -
Inside the commands directory, create a
contactsdirectory. -
Within the
contactsdirectory, create a file namedcreate.liquid. -
In the
contactsdirectory, create another directory namedcreate. -
Inside the
createdirectory, create the following files:
build.liquid
check.liquid
Your folder structure should look like this:
  app
  └── lib
      └── commands
          └── contacts
              ├── create.liquid
              └── create
                  ├── build.liquid
                  └── check.liquid
This folder structure is designed to keep your project organized, easy to maintain, and scalable.
-
libDirectory: This directory holds all your custom libraries and business logic. By placing your commands here, you keep the core logic separate from the views, making the codebase cleaner and easier to manage. -
commandsDirectory: Commands are specific actions or operations that can be invoked. Having a dedicatedcommandsdirectory helps in grouping all such operations together, making them easy to find and modify. -
contactsDirectory: This directory is specifically for commands related to thecontactsfunctionality. Grouping related commands in their own directories prevents clutter and makes it easier to locate the relevant files. -
create.liquidFile: This file acts as an entry point for the create operation. It coordinates the different steps involved in creating a contact, such as building the contact object, validating it, and executing the creation. -
Nested
createDirectory: Inside thecontactsdirectory, thecreatesubdirectory contains the specific steps (build, check, etc.) involved in the create operation. This separation of steps into individual files keeps each file simpler and easier to test.
By structuring your project this way, each piece of functionality is contained in its own module, promoting reuse and reducing the risk of conflicts. This approach also makes it easier for multiple developers to work on the project simultaneously without interfering with each other.
Using the function tag
To create a functional Contact Us form in platformOS, you’ll use the function tag. The function tag works similarly to functions in traditional programming languages. It allows you to call a partial and store the returned result in a variable, which is essential for processing form data like user contacts.
Learn more about the function tag and its usage in our documentation.
First, you'll need to use the function tag and specify a variable name to store the result. Here’s the basic syntax:
{% function variable_name = 'path/to/my/partial', argument: value %}
Let’s add a function tag to your app/views/pages/contacts/create.liquid file:
app/views/pages/contacts/create.liquid
---
method: post
---

{% function contact %}
In our example, contact is the variable that will store the result of the function.
To use it, you need to make sure that the partial returns data using the return tag. If you're using an editor that supports Language Server Protocol (LSP), you can explore examples and get more details about the function tag there.

If you previously added Hello {{ context.params.contact }} for demonstration purposes, you can now remove it from the app/views/pages/contacts/create.liquid file. It was just a placeholder to illustrate passing data.
Specify the path to the partial
You can see that LSP complains about invalid syntax for the function tag, and shows you what’s missing:

{% function variable_name = 'path/to/my/partial', argument: value %}
To use a function tag, you need to specify the path to the partial file that contains the code you want to execute. The next step is to provide this path. You can use LSP to autocomplete the path, so you don’t need to type it manually. In our example, the path leads to the app/lib/commands/contacts/create.liquid file:
app/views/pages/contacts/create.liquid
---
method: post
---

{% function contact = 'commands/contacts/create' %}
Inside the app/views/pages/contacts/create.liquid file, we have Liquid code that uses the function tag. This tag evaluates the code from app/lib/commands/contacts/create.liquid. This is how you invoke the function.
You don't need to specify the 'lib' directory when using the function tag because it automatically knows where to look for the specified file. This simplifies the code and reduces the need for redundant path specifications.
Provide arguments to the function
To make our Contact Us form work, we want to provide arguments to this function:
app/views/pages/contacts/create.liquid
---
method: post
---

{% function contact = 'commands/contacts/create', object: context.params.contact %}
Here, we pass context.params.contact as the object argument. This object contains the email and body parameters that you will use in the partial. You can choose any name for the function. By default, the partial won't have access to any data unless specified.

You might notice that LSP complains that the contact variable is never used and we have an unused object argument. This is true for now, and we will address it in later steps.